Wednesday, October 10, 2012

DIY Personalized Mugs

So now that I am in a long distance relationship I gotta keep my man interested some how! So i decided to make us personalized his and her mugs! I was really excited when i made this project until two things happened; 1, his mug broke in shipping, and 2, the permanent marker rubs off when washed roughly. Cost for project? 50 cents.. ohhyeahh. 

 Materials: Mugs
                 Permanent Markers

1. Draw design, I did the lyrics to our song and a little dootle. (:
2. bake for 30 min at 350 degrees F
3. Drink hot tea from mug!

Tuesday, October 9, 2012

DIY Chest


 This was a project I did while hanging out with Destinee all day (:
We ended up making this chest that looks super cute in my room AND stores all of my craft supplies!
We found this crappy red looking chest at goodwill, it was like ten bucks, I also bought the blue fabric and the lace fabric at goodwill. then i bought black paint from Fred Meyer. I had cushion foam at home so the total of the project ended up being around 20 bucks! 
We started by painting the entire thing black. as you can see in the pic, the paint got a little chipped in the car ride back to my house. Next we took a piece ply wood and used a table saw to cut it down to the same size as the chest lid.
Next I placed the cushion foam on the plywood, and laid the blue fabric over it. 
I then flipped the plywood upside down so the cushion and fabric were facing the floor and staple gunned the fabric to the back of the ply wood. Make sure to pull the fabric really tight so it wont be loose at all. 
Next I laid the lace over it and stapled it to the back side of the plywood as well.
Make sure to staple the fabric down every couple inches so that it stays!
The very last step was to open the chest and screw the ply wood down to the lid of the chest from the inside. 
The whole project took me one afternoon and I LOVE my new chest!


Tuesday, July 10, 2012

Killer Ab work out!

Did this today at my apartment... I was definately sweating by the end. The only thing I changed was doing 10 in and outs instead of leg lifts.

Sunday, July 1, 2012

Organizing: Scarfes and Belts


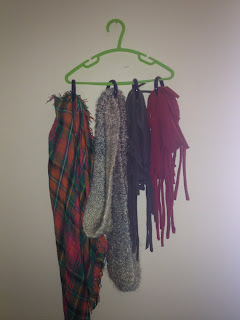
Everyone knows finding a place to store belts and scarfes is a pain in the butt. so what i did was loop them through shower hangers hung on a hanger.

Materials:
Hanger(s)
shower curtain hangers (circular ones)
tape or hot glue.


All I did was loop the shower curtain hangers around the hanger, then tape them in place ( hot glue would probably work better) and then loop my scarfs and belts through. Its so much more organized than my old technique of stuffing them in a drawer. Love This!

DIY Coasters

 My soon to be roomate Kirsten and I, both addicted to pintrist, have been trying out some new DIY for our new house this fall. One of the ones we did were coasters. we found some ways to make coasters personalized with your own pictures, or pained ones. We tried both but fell in love with the picture ones. In fact we decided we wanted to try to fix up an only coffee table by tile-ing it with picture tiles.. just like these coasters.
Materials:
4" by 4" porcelin
Modge Podge
Paint Brush
clear sealer
Hot glue gun
some type of thick fabric
pictures of choice

The tiles were only 33 cents a peice at lowes, the modge podge, paint brushes, sealer, hot glue gun, and fabric i all had at home, and the pictures costed $1.19. the whole project all together was under 3 dollars.
The first thing you want to do is cut the pictures so that they fit just slightly smaller than the size of the tile.

Then you layer modge podge onto the tile and place the picture on top to glue the picture down.
Next you want to evenly apply a layer of modge podge over the top of the pictures. It will look cloudy at first but after a couple of hours the glue will dry and look like a clear sealant is on top.

Once the glue is dry, this may take several hours, paint a thin layer of clear sealer on top and around the sides.

Let them dry again for another couple of hours. While they are drying you can take your fabric, i used fabric made for a couch cover, and cut it out to just slightly smaller than the size of the tile. Once you have enough squares cut out, you want to hot glue them to the under side of the coaster. This way they wont scratch any wooden surface or if you like to stack them to store them, they wont be able to scratch the other ones.

Saturday, June 23, 2012

CSA


Since moving to Ellensburg this past week, I joined a CSA. CSA stands for community supported agriculture. I paid some hundred dollars or so to a farm inorder for them to get me a weekly supply of fresh organic vegitables from now till the end of August. It averaged out to 12 dollars a week. I got my first box today. It came with some onions, green onions, butter leaf lettuce, kale, radishes, broccolini, romaine lettuce, and cilantro. Im not quite sure the price difference between getting it at a grocery store compared to getting it from the CSA but it feels good to know im supporting local agriculture. Also, dont disregard CSA's just because you dont live near farm land. Many CSA's have drop off locations in near-by towns.

Sunday, June 10, 2012

DIY Toothpaste

The other morning I found a recipe for some homemade toothpaste so I decided to give it a try.. The taste is not so good but I figure you probably get used to it.
Ingredients:
Baking soda
Hydrogen peroxide
Mint extract (or cinnamon or whatever you choose)
The ratio is 3 parts baking soda:1part hydrogen peroxide:as much extract as wanted.
It turned out to a really good consistency for me and then I just put it in a jar and use my tooth brush to scoop a little out. I'm the only one using it for me so this isn't 'gross' but if you were to share it with other people in the house you could always put it in a squeezable tube!

Wednesday, June 6, 2012

DIY Scarf

My mom came home from a pampered womans day at her church the other day and showed me this nifty way to use an old tee shit. We tried it first with one of my dad's shirts and it ended up being too big. We did it again with a much smaller old t-shirt of mine.
All you need:
An old T-shirt
Scissors

First your going to cut the t-shirt about 8-10 inches from the bottom.


Then you cut small strips in the shirt just over 1/2 an inch wide starting from the cut side, and cutting towards the hem.


After youve made all the cuts, your going to pull on each strip so that it curls into itself.


And Voila, a new scarf! We did it with a plain old red scarf but we were thinking a bright multi colored shirt would look really pretty.

Sunday, June 3, 2012

DIY Deodorant

Lauren and I also decided to get crazy and make a homemade deodorant today.. We'll see how well it works!
The Ingrediants:
Baking Soda 1/2c... Had at home
Cornstarch  1/2c.... Had at home
 Coconut Oil  5 tbl... $9.99 and I only used half the jar when making double this recipe.


 You could also add some essential oil to make it smell pretty, I just didn't have any at home.


Melt the Coconut oil so that it is liquified and then add the cornstarch and baking soda. The consistency wasn't as thick as we had wanted so we just kept adding equal parts corn starch and baking soda till we got the consistency just right... or so we thought. The next morning it had solidified.  


I decided to melt it back down and then stick it inside a tupperwear container that I had lined with wax paper. Then when it hardened again I took it out. It looks like a bar of soap and works perfect. I wrapped some crinkled newspaper around mine so that it wouldn't get all over my hands while I was putting it on. :P 

DIY Face Wash

Today Lauren and I found a homemade face wash recipe and decided to give it a try!
The Ingredients:
Castor Oil
Olive Oil (or Sunflower Oil)
Tea Tree Oil (optional)
Total cost: $5.00 Since I already had Tea Tree oil and Olive oil laying around at home all I had to buy was the Castor oil, which only cost $5.00!


Oily Skin: 2 or 3 parts castor oil to 1 part olive oil
Normal Skin:1 part castor oil to 1 part olive oil
Dry Skin: 1 part castor oil to 2 or 3 parts olive oil

Lauren and I decided to do the oily skin combination. we mixed the oils together then just added a couple drops of tea tree oil that helps with acne. The castor oil acts as a make up remover and dirt remover while the olive oil keeps a balanced pH and helps keep the natural oils of the skin.
  We were worried about it leaving our skin feeling really oily but it actually feels really healthy and not oily.
To Use:
Rub face wash on face for about one minute.
Take a HOT wash cloth and lay it on your face for about 1 min or until it cools to room temp.
We microwaved our washcloths since the tap water didn't get as hot as we wanted.
Next wipe the oil off the face with the wash cloth and enjoy your baby butt soft skin!(:
 

 We also bought Witch Hazel to use as a toner after we used the face wash.

Saturday, June 2, 2012

Livin' the broke life.

Well, I guess this is my first blog post! -with Yas! Finally figured out how to make a blog! So a little about myself: I am starting my first quarter at CWU this summer as a junior! I'm majoring in nutrition and minoring in exercise science. This blog is basically a mixture of DIY's, Recipes, Work-outs, and my attempt at gardening. I hope you can laugh at all my mistakes just as I will as I learn to live on my own! :D
 Living the broke life...
BAGAR!